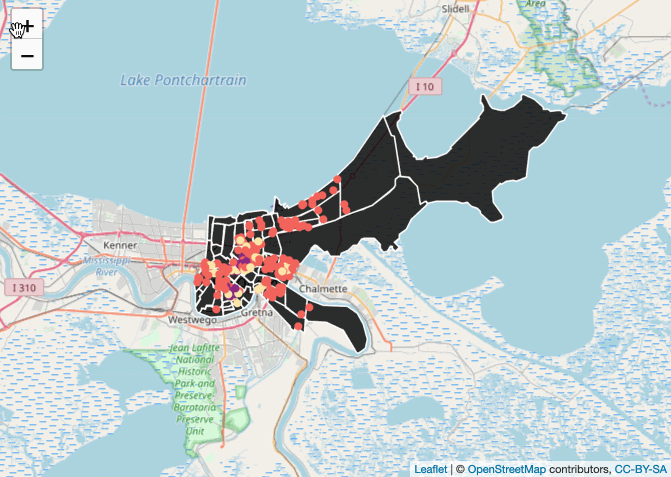
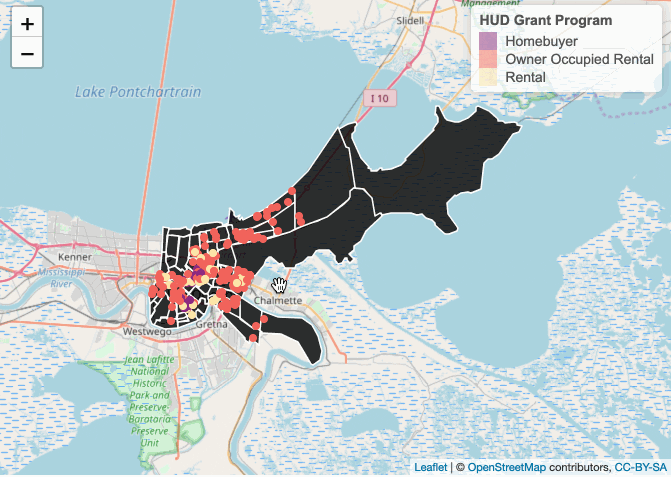
Skip to Main Content

For a version of this post with interactive maps, check it out on GitHub.

Introduction

Oftentimes, when working with public data, there will be a geospatial component to the data — the locations of public libraries, for example, or which neighborhoods of a city are most bike-friendly. In this tutorial, we will walk through how to import, transform, and map data from a public dataset using R. The data we will be using comes from the City of New Orleans Open Data Portal, and concerns grants from the Department of Housing and Urban Development (HUD) given to local partners to help build and rebuild affordable housing in the city after Hurricane Katrina.

HUD distributes government funding to support affordable housing, community development, and reduce homelessness. This dataset contains information about each funding award and the location of the housing development the funding was used for. The data has the potential to provide insight into how New Orleans is continuing to recover from the long-term impact of Hurricane Katrina.

This tutorial came about when, after looking at a static map of HUD grants in New Orleans (pictured below), we wanted to be able to zoom in and examine grant sites in more depth than a static map provides. Interactive maps are great for this sort of deep, customizable exploration.

Static map of New Orleans neighborhoods and where HUD grants applied

Step One: Importing Data

Downloading data from the open data portal

First things first, we need to download the data we want to work with. To create this map, we’ll need two different datasets: the main dataset of HUD grants, found here on the New Orleans data portal, and a dataset that contains a shapefile of New Orleans neighborhoods, which can be found here. We’ll download these by clicking on the Export link, selecting CSV format for the first file, and shapefile for the second (since we’re going to be using that data to map the neighborhood boundaries, it’s easiest to download it in a predefined geospatial format).

Download the files, unzip the shapefile, and place the HUD grant CSV and shapefile folder in your R working directory. If you aren’t sure where that is, run getwd() in your R console.

Setting up an R session

Now that we have our datasets, let’s make sure our R session has the proper setup. Load the tidyverse (used here for data wrangling), sf (simple features package used for geospatial data), leaflet (an R implementation of the Leaflet Javascript plotting library), and viridis (better color maps) packages like below:

library(tidyverse)
library(sf)
library(leaflet)
library(viridis)

Next, we’ll read in the neighborhood and HUD grant data. read_sf() and read_csv() are standard functions to read in data, but we’ll want to make sure that our HUD grant data is properly recognized as geospatial data. To do that, we use the st_as_sf() function to transform the Longitude and Latitude columns of the CSV into simple features for plotting.

neighborhoods <- read_sf("new_orleans_neighborhoods")
hud_grants <- read_csv("new_orleans_hud_grants.csv") %>% 
  st_as_sf(coords = c("Longitude", "Latitude"), 
           crs = 4326, agr = "field")

Step Two: Transforming Data

Now that we have our data read into R, let’s clean it up a bit and create some readable labels for our map. The below code is fairly standard data cleaning, and will be different for each dataset, so I’m not going to go into it too much here:

capwords <- function(s) {
  cap <- function(s) paste(toupper(substring(s, 1, 1)),
                           {tolower(substring(s, 2))},
                           sep = "", collapse = " ")
  sapply(strsplit(s, split = " "), cap, USE.NAMES = !is.null(names(s)))
}

neighborhoods_clean <- neighborhoods %>% 
  st_transform(4326) %>% 
  mutate(neighborhood_label = paste0('<b>Neighborhood:</b> ', 
                                     capwords(GNOCDC_LAB)))

hud_grants_clean <- hud_grants %>% 
  rename(OCD_Program = `OCD Program`) %>% 
  filter(OCD_Program != "None") %>% 
  mutate(popup_label = paste(paste0('<b>Partner: ', Partnership, '</b>'),
                             paste0('Address: ', Address), 
                             sep = '<br/>'))

There is an important point about geospatial mapping here, however; in the st_transform(4326) we take the neighborhoods dataset and transform it into the proper projection system. When mapping, you need to make sure all your spatial datasets are in the same projection system — in this case, 4326, which corresponds to WGS 84.

Another general point about leaflet: when we create our grant project label, we use HTML formatting codes like <br/> and <b>. It’s not necessary to have a full understanding of HTML to make interactive maps — certainly, these labels don’t need formatting — but knowing how to bold, italicize, and put line breaks in your labels will make your maps that much nicer and easier to use.

Step Three: Mapping Data

It’s helpful, when making a map using leaflet, to think about the process in terms of building a map up from its constituent pieces: first you have the map, then the neighborhood areas, then the grant project markers. Each piece is layered on top of each other — physically, in the map, and virtually, in your code. To emphasize this point, we’ll walk piece-by-piece through making our map, with images of the map along the way.

Your Base Map

The first step in any mapping project, once you’re ready to build your map, is to choose what your base map is going to be. The leaflet package has a variety of basemaps, which run the gamut from highly-detailed, realistic maps (e.g., OpenStreetMap) to stylized art (Stamen’s watercolor tiles). For this map, we’ll use the OpenStreetMap basemap, since it has a number of nice details that will help contextualize the grant locations, like landmark names and types. Below is what the basemap looks like when we’ve only loaded the map, no data in it yet. We can still zoom in and move around and explore the OpenStreetMap tiles, though.

leaflet() %>% 
  addTiles()
Animated gif showing the user zooming in on New Orleans from a map of the globe

In this code, we used addTiles() to add the OpenStreetMap basemap, which works because OpenStreetMap is the default basemap for Leaflet. If we wanted to use a different basemap, e.g. Stamen Toner, we’d do something like addProviderTiles(“Stamen.Toner”).

You’ll notice that the initial view is zoomed out to the whole world; we could manually set it to be zoomed in on New Orleans, but if we add our data, then the map will automatically focus around the data in the map. Let’s try it by adding our neighborhood data.

Adding Polygons (Neighborhoods)

leaflet() %>% 
  addTiles() %>% 
  addPolygons(data = neighborhoods_clean,
              color = 'white',
              weight = 1.5,
              opacity = 1,
              fillColor = 'black',
              fillOpacity = .8,
              highlightOptions = highlightOptions(color = "#FFF1BE", 
                                                  weight = 5),
              popup = ~neighborhood_label)
Animated gif showing the result of creating neighborhood shapes on top of the map

To replicate the static map above, the line color is set to white and the fill to black. The opacity of the fill is .8, which is only slightly transparent, to both preserve the starkness of the initial display of the map, which will look a lot like the static image, and allow people to zoom in and still be able to see the basemap detail underlying the polygons. Information overload is a danger when creating interactive visualizations; having relatively opaque neighborhood areas in this map (literally) blocks out some of the detail, focusing the reader’s eyes on what you want them to look at.

Adding Points (Grant Projects)

Now, let’s add in the grant programs. To replicate the static image, we’re going to have to create a color palette to color our markers, which we do through the use of the colorFactor function in leaflet. Our palette is a slightly modified version of the magma palette from the viridisfamily, compressed so that each color is visible on a dark background (surprisingly, dark purple and black don’t go that well together).

Another important thing to note here, which you may have noticed from the addPolygons call, is that in order to use the name of a variable from our data in a leaflet function parameter, we need to precede it with a tilde (~). This creates a one-sided formula, which leaflet knows to evaluate in the context of your input data. For example, when we run addCircleMarkers(data = hud_grants_clean, popup = ~popup_label), the popup = ~popup_label will be evaluated as using the popup_label column from the hud_grants_clean table.

By now, we’ve started to add interactive and clickable components to our maps. You can click on neighborhoods and see the neighborhood label, or click on different project markers to see which partner organization worked on the project and the address of the project.

pal <- colorFactor(
  palette = viridis_pal(begin = .4, end = .95, option = 'A')(3),
  domain = hud_grants_clean$OCD_Program
)

leaflet() %>% 
  addTiles() %>% 
  addPolygons(data = neighborhoods_clean,
              color = 'white',
              weight = 1.5,
              opacity = 1,
              fillColor = 'black',
              fillOpacity = .8,
              highlightOptions = highlightOptions(color = "#FFF1BE", 
                                                  weight = 5),
              popup = ~neighborhood_label) %>% 
  addCircleMarkers(data = hud_grants_clean,
                   popup = ~popup_label,
                   stroke = F,
                   radius = 4,
                   fillColor = ~pal(OCD_Program),
                   fillOpacity = 1)
Animated gif showing the user adding in the HUD data overlay

Adding a Legend

The final step in creating our map is to add a legend to indicate which programs are represented with which colors. Thankfully, doing this is easy — we just use the addLegend function and point it to our data, the color palette we used, the values we’re representing on the legend, and add a title.

leaflet() %>% 
  addTiles() %>% 
  addPolygons(data = neighborhoods_clean,
              color = 'white',
              weight = 1.5,
              opacity = 1,
              fillColor = 'black',
              fillOpacity = .8,
              highlightOptions = highlightOptions(color = "#FFF1BE", 
                                                  weight = 5),
              popup = ~neighborhood_label) %>% 
  addCircleMarkers(data = hud_grants_clean,
                   popup = ~popup_label,
                   stroke = F,
                   radius = 4,
                   fillColor = ~pal(OCD_Program),
                   fillOpacity = 1) %>% 
  addLegend(data = hud_grants_clean,
            pal = pal,
            values = ~OCD_Program,
            title = "HUD Grant Program")
Animated gif showing the user viewing the data with the associated legend

In this tutorial, we’ve walked through how to import, transform, and map public data to create an interactive map in place of a static map. Along the way, we’ve touched on important visualization concepts like avoiding information overload, the appropriate degree of stylization, and choosing compatible colors. We’ve also created a pretty awesome map! Hopefully, this tutorial will help you be able to create your own interesting and useful interactive maps in the future.

If you’re interested in walking through this tutorial yourself in R, the RMarkdown file is available here; just put it in the same directory as the city data files and you’ll be able to run all the code in this tutorial yourself. Take a look at our GitHub page to play with the interactive maps yourself.

And while we’ve only worked with this New Orleans HUD grant data in this tutorial, the import and mapping steps should be applicable to any sort of public geospatial data. Many cities have easily accessible data in their open data portals; go out and give it a shot!