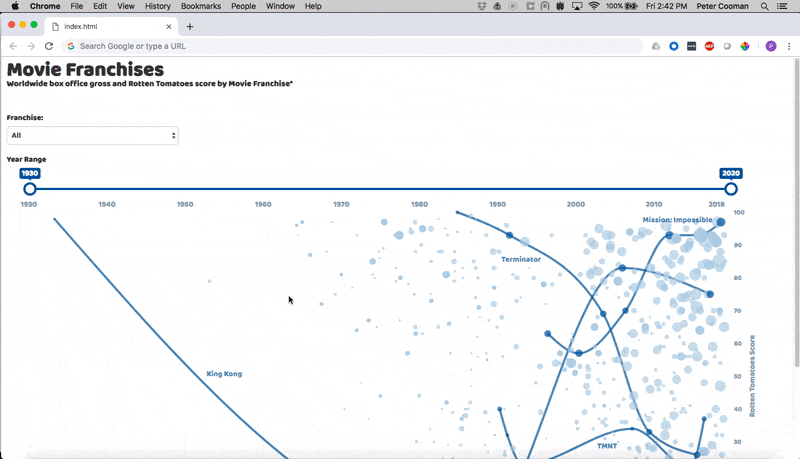
Skip to Main Content

The path to D3 mastery is dark and full of terrors. D3 itself is a JavaScript (JS) library and on top of that, you’ll need a basic understanding of HTML (Hypertext Markup Language) and CSS (Cascading Style Sheets) to get the most out of it. If you’re a data scientist, chances are JavaScript, at best, ranks as your fourth language, after R, Python, and SQL. In this three-part series of blog posts, I will show you step-by-step how you can combine R with D3, HTML, and CSS to create a fully interactive data visualization from scratch.

As a guiding example, we will build the following interactive data visualization (available here):

Animated Gif showing the result of the tutorial — a rich, interactive data visualization

For all movie franchises with at least four movies, we show the Rotten Tomatoes score on the Y-axis, plotted against the movie release dates on the X-axis. The size of each bubble is proportional to a movie’s worldwide box office gross. This will hopefully show us the relationship between a movie’s box office and its quality. Which franchises got better or worse over time? Which movies were the high and low points for each franchise? How are critical darlings faring at the box office and which franchises keep raking in the cash despite poor reviews?

The inspiration for this work comes from the Economist’s excellent visualization of TV shows, which you can find here: “TV’s golden age is real”, published November 24th, 2018. To give it my own twist, I combined data on the most popular franchises from By the Numbers with movie ratings data from OMDb. For convenience, we’ve made the combined data set available here.

In this first part, we’ll create a template that we can use for this and any future D3 data visualization you’d like to build. We’ll start by reviewing some basic HTML and CSS. Then we’ll set up our canvas, including a title, subtitle, and caption, sizing, and margins. Finally, I’ll show how you can inject data from R into your HTML code and display your visualization — for now just a blank canvas — in your browser or in Rstudio’s Viewer Pane. In Part 2, we’ll build on this template by plotting a static version of the visualization. We’ll draw all circles, lines, and labels, to get you familiar with binding graphical objects to data, before moving on to adding interactivity (i.e., dropdown menus, tooltips, and dynamic highlighting) in Part 3.

If you want to play around with the fully interactive version you can do so here, or download the full code for all three parts here.

Let’s get started!

1. The basic components of an HTML document

Most of our code will use JS, but our final product will be an HTML document that a browser can display. HTML uses opening and closing tags (for example, <html> and </html>) to mark the beginning and end of different code sections (note the backslash ‘/’ in the closing tag). Every HTML document has a head section and a body section, both wrapped within a pair of <html></html> tags:

<!DOCTYPE html>
<html>
<head>
<meta charset="utf-8">
</head>
<body>
</body>
</html>

The <!DOCTYPE html> and <meta charset=”utf-8″> tags let your browser know that this is an HTML document and that it should use the utf-8 character set, capable of encoding all characters on the web. They’re not strictly necessary, as your browser will assume these as its default settings, but if you ever come across them in the future, you’ll know what they’re for.

We will use the head section to import JS libraries and add custom stylings using a style section written in CSS. The body section will form the bulk of our code. Here we will define the overall layout of the page (using HTML) and build the actual visualization (using D3 and any other JS libraries we imported).

Create a new document called ‘index.html’ and add the code above. Double clicking it should open a new browser tab, showing a blank page.

2. Importing JS libraries

Add the following lines to the head section of your new index.html file (within the <head></head> tags):

The first line imports the current version of D3 (v5). The ‘min’ in the name indicates that this is a minimized version, meaning that it is optimized to take up less memory.

The second line imports jQuery, a JS library for navigating and manipulating the Document Object Model (DOM). Think of the DOM as a hierarchical tree containing all the objects on your page. For example, <div> tags segment sections into containers, while <svg> tags hold shapes like circles and lines. We won’t be using jQuery just yet, but we’re including it here in preparation of Part 3.

Our third imported library is Underscore. This library is great for extracting a column as an array from a JSON object (JS’s version of a data table) and for many other handy tricks like sorting or filtering an array or calculating its minimum or maximum.

Our fourth and final imported library is Bootstrap. This is another very popular library, this time for defining a lot of nice custom stylings for free.

3. Setting up the canvas

Let’s put something on our page! We’ll use some basic HTML to add a title, subtitle, and caption. We’ll also create a space for our main visualization in between the subtitle and the caption.

Add the following code to your body section (within the <body></body> tags):

<body>
   <div id='title' style='width:1366px;'>
      <h1>Title</h1>
      <h2>Subtitle</h2>
   </div>
   <div id='vis' style='width:1366px;'>
       <svg class='chart-outer'><g class='chart'></g></svg>
   </div>
   <div id='caption' style='width:1366px;'>
      <p style='text-align:right'>Caption</p>
   </div>
   </body>

After loading this into your browser, you should see something like this:

Unstyled HTML screenshot of "Title, Subtitle, caption"

Wow, what a great start! (If you still see a blank page, read the Troubleshooting section at the end of this article.)

Let’s review the code to see what we just did. We created three <div> containers: one for the title and subtitle, one for the visualization, and another one for the caption. As the name implies, a <div> container is a place where you can store different objects. It’s a convenient way to separate one part of your page from another. By default, these <div> containers will be stacked vertically one on top of the other, but you can also organize them side by side.

We assign each <div> an ID in its opening tag (e.g. id = ‘title’). IDs must be unique. Each <div> can only have one ID and each ID can only refer to one <div>. We also define the width of each <div> (here set to 1,366 pixels).

Within our title <div>, I’ve added two header blocks: a level 1 header (<h1></h1>) for the main title and a level 2 header (<h2></h2>) for the subtitle. These are just placeholders; feel free to edit the text within these tags to the titles of your choosing. In the caption <div>, I’ve added a paragraph of basic text (<p></p>). Note the use of style=’text-align:right’ in the opening tag of the paragraph. This aligns the end of the caption with the right edge of the container.

Finally, I’ve added an <svg> element to the vis container and a <g> element to the <svg>. SVG stands for Scalable Vector Graphic, which is a fancy way of saying “shapes,” like rectangles, circles, lines, and so on. ) The <g> stands for “group,” which implies that there will be a grouping of multiple SVGs coming. Think of the <svg> as your base canvas and the <g> group as all the elements within that canvas. If you were to translate or rotate the canvas, all its <g> sub-elements will move in sync. We’ll cover both of these in much more detail in Part 2.

Note that the <svg> and <g> elements didn’t get an ID. Instead, I assigned them a class. As opposed to IDs, each object can have multiple classes and each class can refer to multiple objects. These IDs and classes will come in handy soon. They allow us to set custom styling for objects of a specific ID and or class and offer a convenient way to select and manipulate all objects with a given ID or class. In all subsequent code, we’ll use IDs for <div> containers only and classes for everything else.

4. Adding custom styling with CSS

Let’s add some flavor to those titles!

Add this next code block to your head section (inside the <head></head> tags), and after your imported <script> and <link> libraries:

<style>
  @import url('https://fonts.googleapis.com/css?family=Baloo+Thambi');h1 {
     font-size:16px sans-serif;
     line-height:0.2em;
     font-weight: bold;
     font-family: Baloo Thambi;
   }h2 {
     font: 15px sans-serif;
     line-height: 0.2em;
     font-weight: bold;
     font-family: Baloo Thambi;
   }
   
   p {
     fill: #8FA2AC;
     font-family: Baloo Thambi;
     font-size: 12px;
   }.chart {
     font-family: Baloo Thambi;
   }</style>
</head>

Our first order of business is to import a custom font. This is optional, and you can always use any web-safe font (e.g., Arial, Times New Roman, Courier. See here for a full list). These come pre-installed with modern browsers, so you can use these freely without worrying about importing new fonts. But where’s the fun in that?!?

Google Fonts is a great place to start experimenting with typography. It has a wide selection of free fonts to choose from. Given that our goal is to visualize data, I highly recommend you choose a font in the ‘Sans Serif’ category. These fonts don’t have the little dangly end-bits, which makes chart labels easier to read. Once you’ve decided on the font you’d like to use (I went with Baloo Thambi here), you can easily import it with the following line:

Just make sure you replace <font name> with the name of your chosen font. If the font name has multiple words, combine them using a ‘+’ sign (e.g., family=Baloo+Thambi). If you decide to use an imported font, do so at the very start of your style section, to make it available for the subsequent stylings.

If something goes wrong and the browser doesn’t recognize the font family, it will still display the text, but using the browser’s default font (this can vary depending on your browser and settings, but it’s often Times New Roman).

Next, we’ll take a closer look at the styling blocks. The basic format of these blocks is as follows:

<selector (either an HTML tag, an ID, or a class)> {
<style property>: <property value>;
}

The selector allows us to specify which objects the style should be applied to. This can be one of three types:

  • To style an HTML tag, such as h1, simply use the name of the tag. This type of style block defines the styling for anything encapsulated within <h1></h1> tags (in our example, this is just the main title).
  • To style tags with a specific ID, we use ‘#<ID name>’ as the selector, such as #caption
  • To style tags with a specific class, we use ‘.<class name>’ as the selector, such as .chart

It’s a common mistake to forget the leading ‘.’ period or ‘#’ hashtag. It’s also possible to create selectors with multiple elements, separated by spaces, to create a more narrow focus. For example, ‘.chart p’ would change the styling for all paragraphs within .chart objects, but would leave paragraphs outside of .chart objects unaffected. You can use a single style block for multiple objects by including multiple selectors separated by commas. Go here for even more options,

There is a long list of CSS properties to choose from. The ones I’ve used here are self-explanatory, with the exception of fill and line-height. Fill controls the font color and line-height controls the height of a line of text. Setting line-height to 0.2em prints the title and subtitle closer to each other.

With these fancy new stylings added to your index.html file, your page should now look like this:

HTML screenshot of "Title, Subtitle, Caption, but with some basic font styling applied.

We’ll introduce more custom stylings (and new style properties) in Parts 2 and 3 as we add the circles and curves that make up the visualization, but these basic stylings should serve you well for now and form a solid basis for any other visualizations.

5. Set the dimensions and margins of your canvas

You’ve gotten a taste of HTML and CSS, and now it’s time to dive into JS!

Add the following code block to your body section, after your <div> containers:

<script>
  var vis_width = 1366;
  var vis_height = 650;
  var params = {};draw = function(data, vis_width, vis_height, params) {var margin = {top: 30, right: 30, bottom: 30, left: 30};
      var width = vis_width - margin.left - margin.right,
          height = vis_height - margin.top - margin.bottom;d3.select('.chart-outer')
          .attr('width', vis_width)
          .attr('height', vis_height);var svg = d3.select('.chart').append('svg')
            .attr('width', vis_width)
            .attr('height', vis_width)
          .append('g')
            .attr('transform', 'translate(' + margin.left + ',' + margin.top + ')');
  }draw(data,vis_width,vis_height,params);</script>
</body>

The first thing to notice here are the <script></script> tags. These let your browser know that the code within the tags is JS.

We start by defining some variables. In JS, this is done using

var <name> = <value>;

The var keyword lets JS know we’re defining a new variable. The semicolon ‘;’ at the end terminates the statement. The vis_width and vis_height variables define the width and height of the canvas. These values will soon be used by the draw() function.

The draw() function is a bit of a personal preference. You could take its contents out of the function and it will still run fine. I prefer to use a function for this because it allows me to redraw the chart based on an input (e.g., from a dropdown menu). For example, you could add a dropdown menu that allows users to select an input data set. Then whenever they select a different data set, you can pass that along to the draw() function to redraw the chart. We’ll show an example of how you can use this mechanism in Part 3, where we’ll add a range slider. As users adjust the slider, we’ll redraw the chart such that the date range of the plot reflects the slider inputs.

In draw(), we define a margin variable that we’ll use to control the margins between the plot area (where the circles and curves go) and the outer frame of the chart. We add these margins to make sure there is room for things like axes, axis titles, tick marks, and tick labels. Without margins, these elements will be cut off.

We’ve finally arrived at our first D3 command!

d3.select('.chart-outer')
          .attr('width', vis_width)
          .attr('height', vis_height);

With d3.select(‘.chart-outer’), we select the object with class ‘chart-outer’ (note the leading period!). Once we have selected this object, we can chain additional commands to manipulate it. Here we set the width attribute to vis_width (1366px) and the height attribute to vis_height (650px).

The next segment is trickier:

var svg = d3.select('.chart').append('svg')
            .attr('width', vis_width)
            .attr('height', vis_width)
          .append('g')
            .attr('transform', 'translate(' + margin.left + ',' + margin.top + ')');

The var again indicates we want to create a new variable, this time called svg. In other words, we first select the object with class .chart (earlier we defined this as a group <g>); we then append a new SVG object, setting its width and height to vis_width and vis_height respectively. We append a new group <g> and translate this entire group to the left by margin.left pixels, and push it to the bottom by margin.top pixels.

This seems like a lot, but all we’ve done is create a useful short-cut. Later, in Part 2, when we define new graphical elements (like a circle), we will only need to call svg, instead of having to repeat the code above. This ensures that any new element added to this svg attaches to the right parent object in the page hierarchy and that it inherits the margin translations. Later on, if we decide to translate or rotate svg, all its child elements will translate and rotate along with it, which saves us a lot of hassle.

I’ve also added an empty params variable here that gets passed on to the draw() function. Later, in Parts 2 and 3, I will use this to customize the chart and add interactivity, but you can ignore it for now.

Fire off your new index.html and you will see the following:

HTML screenshot of "Title, Subtitle, Caption, but with some basic font styling applied (unchanged from above)

Huh … ok, that’s … not quite right. The canvas section should be 650px high — the full height of the screen — but it looks like it’s much shorter. It’s time for … drumroll …

6. Troubleshooting

How do you know you did everything right? Debugging your D3 code can be difficult because loading your new page won’t show you any error messages, often you’ll just be staring at a blank page.

To check for errors, run your code in a browser, right-click anywhere on the page and select ‘Inspect’:

HTML screenshot of "Title, Subtitle, Caption, but with some basic font styling applied, where the user has right clicked in the browser to bring up the inspect menu item

This will open your browser’s Developer Console:

HTML screenshot of "Title, Subtitle, Caption, but with some basic font styling applied, with the inspect developer panel expanded to see the error that was caught in the console.

I am using Google Chrome. If you’re using a different browser, your Developer Console may look differently.

The ‘elements’ tab shows us the DOM, the hierarchical tree of all elements that are on your page. If certain objects are not being displayed, check the hierarchy to make sure they actually exist or whether they were created but not visible. This can happen quite easily. You may have set the fill to white on a white background, or opacity to 0 or set the object to be invisible, or the position of the object may lie outside of the plotted area due to faulty scaling. Looking through the hierarchy is a good sanity check and allows you to narrow down the root causes of your errors.

The console tab is another great place for troubleshooting. One way to check for errors is to print log messages to the console using the console.log() command. You can either print a message to check whether the correct code is being executed (eg. console.log(‘in draw function’)) or check the value of a parameter or a table (e.g. console.log(vis_height)). You can put a break in your code by adding the phrase debugger;. Make sure you have the Developer Console open and trigger the code (e.g., refresh the page or hover over an object); the browser will pause when it encounters the debugger command, allowing you to investigate the current state of variables, data, parameters, etc. This is especially handy to look inside if-else conditions, functions, and for-loops, to make sure all input are within scope. Finally, the console is a great place for some trial and error whenever you’re unsure about the correct JS code. Just slap a debugger in your code to pause the code where you want and try out some code until you get the desired effect (for example, selecting and highlighting a group of dots or calculating the average of an array).

Returning to our example, it appears we forgot to input our data. We’ll fix that in the next section!

7. Injecting data into D3

After all this HTML, CSS and JS, we’re returning to what is hopefully more familiar territory: R! R nicely complements D3, because it excels at data wrangling, something that is rather painful to do in JS. So you can use all your favorite R tools (dplyr! tidyr! lubridate!) to get your data ready for plotting and then inject it into your JS code. We will be using a trick described by James Thompson in his 2014 blog post Introducing R2D3. Until now, you’ve been writing all of your code directly into your index.html file. We will now split our code over three files:

  • header.txt (first part of your index.html code)
  • footer.txt (second part of your index.html code)
  • main.R (the R script that ties it all together)

Make sure these three scripts are located in the same directory.

The trick is to define a new div container with ID data in the <head></head> section:

<script type='application/json' id='data'>

The header.txt file will just consist of the imported libraries and this new line. Note that there is no </script> closing tag. This is intentional!

Everything else goes into the footer.txt file. Now add a </script> closing tag at the very beginning (before the <style></style> section) and add

var data = JSON.parse(document.getElementById('data').innerHTML);

to the <script></script> section (where you defined the var_width and var_height parameters).

I promise this will make sense soon. In our new main.R script, we can now inject the data by concatenating the header, data, and footer. This line

var data = JSON.parse(document.getElementById('data').innerHTML);

will check the data <div> and grab its innerHTML, where we just printed our data! Through this little detour, we’ve transferred our data from R into the JS code and we’re now ready to visualize it.

For convenience, here is the full code for the three scripts:

main.R

library(readr)
library(jsonlite)df <-read.csv('../Data/movie_franchises.csv')df_json <- jsonlite::toJSON(df)header <- read_file("header.txt")
footer <- read_file("footer.txt")
script <- paste0(header,
                 df_json,
                 footer)# To show in browser
fileConn <- file('index.html')
writeLines(script, fileConn)
close(fileConn)
rstudioapi::viewer('index.html')

header.txt

<!DOCTYPE html>
<html>
<head>
<meta charset="utf-8"><script src='https://d3js.org/d3.v5.min.js'></script>
<script src='https://rawgit.com/jashkenas/underscore/master/underscore-min.js'></script>  
<link href='https://cdnjs.cloudflare.com/ajax/libs/twitter-bootstrap/3.3.4/css/bootstrap.min.css' rel='stylesheet'>
<script type='application/json' id='data'>

footer.txt

</script><style>
  @import url('https://fonts.googleapis.com/css?family=Baloo+Thambi');h1 {
     font-size:16px sans-serif;
     line-height:0.2em;
     font-weight: bold;
     font-family: Baloo Thambi;
   }h2 {
     font: 15px sans-serif;
     line-height:0.2em;
     font-weight: bold;
     font-family: Baloo Thambi;
   }
   
   p {
     fill: #8FA2AC;
     font-family: Baloo Thambi;
     font-size: 12px;
   }.chart {
     font-family: Baloo Thambi;
   }
</style></head><body>
   <div id='title' style='width:1366px;'>
      <h1>Title</h1>
      <h2>Subtitle</h2>
      <br></br>
   </div>
   <div id='vis' style='width:1366px;'>
       <svg class='chart-outer'><g class='chart'></g></svg>
   </div>
   <div id='caption' style='width:1366px;'>
      <p style='text-align:right'>Caption</p>
   </div><script>var data = JSON.parse(document.getElementById('data').innerHTML);
  var vis_width = 1366;
  var vis_height = 650;
  var params = {};draw = function(data, vis_width, vis_height, params) {var margin = {top: 30, right: 30, bottom: 30, left: 30};
      var width = vis_width - margin.left - margin.right,
          height = vis_height - margin.top - margin.bottom;
      d3.select('.chart-outer')
          .attr('width', vis_width)
          .attr('height', vis_height);var svg = d3.select('.chart').append('svg')
            .attr('width', vis_width)
            .attr('height', vis_width)
          .append('g')
            .attr('transform', 'translate(' + margin.left + ',' + margin.top + ')');document.getElementById('vis').setAttribute('style','height:'+vis_height+'px');
  }draw(data,vis_width,vis_height,params);</script>
</body>
</html>

In main.R, we first import our data. To convert our R data table into a JSON table that JS can use, we convert it using the toJSON() function in the jsonlite library.

I recommend opening all three scripts in RStudio, so you can easily go back and forth as you make changes to the code.

Running main.R will create an index.html file. As before, double click that file to open up a new browser window or tab.

8. Other display options

Manually loading the index.html file gets old after a while, so here are two alternatives. First, we can let R open the index.html file for us. After closing the file connection, simply call

viewer(‘index.html’).

This will start your default browser (or create a new tab) and display your page.

If you’d rather stay within RStudio, you can render index.html in the Viewer Pane with:

tempDir <- tempfile() # --> this is key!
dir.create(tempDir)
htmlFile <- file.path(tempDir, "index.html")fileConn <- file(htmlFile)
writeLines(script, fileConn)
close(fileConn)viewer <- getOption("viewer")
viewer(htmlFile)

9. Next Steps

Congratulations for making it this far! We’ve covered a lot of material across four different programming languages! You now have a template that you can use again and again to build beautiful and fully interactive data visualizations with D3. If you just want to grab the final code, you can do so from our GitHub repo. I’ve included additional comments with that code that are not in the code shown above. I hope to see you again in Part 2, where I will show you step-by-step how you can use D3 to define scales and bind graphical elements (circles, lines, labels, etc.) to your data.